들어가기 전
Swagger VS RestDocs
Swagger
- 장점
- 간편하게 사용 가능하다
- 설정 파일과 어노테이션만 사용해 간단하게 적용할 수 있다.
- 개발 된 API의 요청 및 응답 테스트가 가능하다.
- 웹 상에서 Postman을 사용하듯이 API를 편하게 테스트 할 수 있다.
- 간편하게 사용 가능하다
- 단점
- 컨트롤러 코드에 어노테이션을 추가하여 자동으로 API를 명세하는 방법을 사용한다.
- 상세하게 명세하기 위해서는 어노테이션 설정이 길어지기 때문에 코드 가독성이 떨어진다.
- 테스트를 거지치 않은 API를 명세해준다.
- API의 신뢰도가 떨어진다.
- 컨트롤러 코드에 어노테이션을 추가하여 자동으로 API를 명세하는 방법을 사용한다.
RestDocs
- 장점
- 컨트롤러에 어노테이션을 추가할 필요가 없다.
- 코드 가독성이 올라간다.
- 테스트를 통과한 API만 명세할 수 있다.
- API의 신뢰도가 올라간다.
- 컨트롤러에 어노테이션을 추가할 필요가 없다.
- 단점
- API의 요청 및 응답 테스트가 불가능하다
- 해당 기능을 지원하지 않는다.
- Swagger에 비해 적용하기 어렵고 작성해야 할 것들이 많다.
- API의 요청 및 응답 테스트가 불가능하다
| RestDocs | Swagger | |
|---|---|---|
| 명세서 자동생성 | O | O |
| 요청, 응답 테스트 | X | O |
| 테스트 강제 | O , 신뢰도 좋음 | X , 신뢰도 별로 |
| 난이도 | 어려움 | 쉬움 |
| 코드 가독성 | 좋음 | 안좋음 |
각각의 장점만 가져와서 사용할 수 있을까?
- Swagger의 요청, 응답 테스트 기능과 RestDocs의 테스트 강제 기능을 합쳐서 사용할 수 있을까?
- RestDocs의 결과물을 이용해 Swagger를 명세한다면 충분히 가능하다.
어떻게 가능하지?
- Swagger는 OpenAPI를 Implement하기 위한 도구이다.
- OpenAPI(이하 OAS)는 RESTful API를 기 정의된 규칙에 맞게 API spec을 json이나 yaml로 표현하는 방식을 의미한다.
- 즉, 원하는 OAS의 yaml(또는 json) 파일만 있다면 편하게 Swagger를 적용할 수 있다.
- RestDocs로 OAS 파일을 생성할 수 있다.
- 독일 기업 epages에서 RestDocs와 연동해 OAS 파일을 만들어주는 오픈소스를 제공하고 있다.
- 이 오픈소스를 사용하면 OAS 파일을 생성할 수 있다.
적용하기
build.gradle
- plugin
1
2
3
4
5
6
plugins {
	// adoc 파일 변환, build 디렉도리에 복사
   id "org.asciidoctor.jvm.convert" version "3.3.2"
	// 테스트 결과를 OAS용 yaml 파일로 변환
   id "com.epages.restdocs-api-spec" version "0.16.2"
}
- configurations
1
2
3
4
5
6
7
configurations {
	// Asciidoctor를 확장하는 종속성
   asciidoctorExt
   compileOnly {
      extendsFrom annotationProcessor
   }
}
- dependencies
1
2
3
4
5
6
7
dependencies {
	// mockMvc를 사용해 snippets를 생성
   testImplementation("org.springframework.restdocs:spring-restdocs-mockmvc")
	// restdocs로 OAS용 파일로 변환
   testImplementation("com.epages:restdocs-api-spec:0.16.2")
   testImplementation("com.epages:restdocs-api-spec-mockmvc:0.16.2")
}
- ext
1
2
3
4
ext {  // 전역변수
 // 스니펫 생성 디렉토리 설정
	set("snippetsDir", file("build/generated-snippets"))
}
- tasks
1
2
3
4
5
6
7
8
9
10
11
12
13
14
15
16
17
18
19
20
21
22
23
24
25
26
27
28
29
30
31
32
33
34
35
36
37
38
39
40
41
42
43
44
45
46
47
48
49
// ./gradlew clean restDocsTest 시 restDocs 파일 생성
tasks.register("restDocsTest", Test) {
   outputs.dir snippetsDir
   useJUnitPlatform {
      includeTags("restDocs")
   }
   finalizedBy "asciidoctor"
   finalizedBy "openapi3"
   finalizedBy "bearerAuthentication"
}

tasks.named("asciidoctor") {
   configurations 'asciidoctorExt'
   baseDirFollowsSourceFile()
   inputs.dir snippetsDir
   dependsOn restDocsTest
}

// yaml 파일 생성 시 설정
openapi3 {
   servers = [
         { url = 'http://localhost:8080' },
   ]
   title = 'Moa Moa Swagger + RestDocs API'
   description = '이 문서는 RestDocs로 테스트 된 API만 모아둔 문서입니다.\n' +
         '아직 개발중인 API와 함께 모아둔 문서를 확인하고 싶으시다면 http://localhost:8080/swagger-ui/index.html 로,\n' +
         'RestDocs를 이용한 API 명세서를 확인하고 싶으시다면 http://localhost:8080/docs/index.html 로 접속해주세요.'
   version = "${project.version}"
   format = 'yaml'
}

tasks.register("bearerAuthentication") {
    // epages사의 restdocs-api-spec 라이브러리에는 bearer 설정이 없음, 생성된 yaml 파일에 bearer 설정을 문자열로 추가
	doLast {
		def apiSpecFile = file('build/api-spec/openapi3.yaml')
		def contentToAdd =
				"  securitySchemes:\n" +
				"    bearerAuth:\n" +
						"      type: http\n" +
						"      scheme: bearer\n" +
						"      bearerFormat: JWT\n" +
						"\n"+
				"security:\n" +
				"  - bearerAuth: []"
		def existingContent = apiSpecFile.text
		def updatedContent = existingContent + contentToAdd
		apiSpecFile.write(updatedContent)
	}
}
- bootJar
1
2
3
4
5
6
7
8
9
10
11
12
13
14
15
16
bootJar {
	// 루트 아래 다운받은 swagger-ui
   from("swagger-ui") {
      into "BOOT-INF/classes/static/swagger"
   }
	// RestDocs html 파일
   from("${asciidoctor.outputDir}") {
      into "BOOT-INF/classes/static/docs"
   }
	// openapi3-yaml
   from("build/api-spec") {
      into "BOOT-INF/classes/static/swagger"
   }
   archiveFileName.set "moamoa.jar"
}
RestDocs 적용
- 테스트 코드를 작성한다.
- 테스트 코드가 성공한다면 build.gradle에서 설정했던 경로인 “build/generated-snippets”에 스니펫이 생성된다.
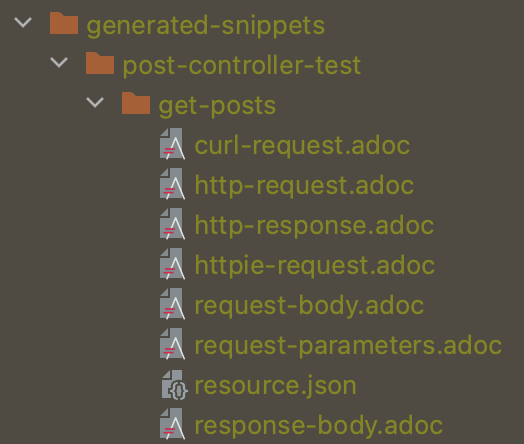
생성된 스니펫
!["스니펫 파일 경로"]()
- default로 생성되는 스니펫
- curl-request.adoc
- http-request.adoc
- http-response.adoc
- httpie-request.adoc
- request body
- response body
테스트 코드에서 추가적인 내용을 설정할 수 있다. ex) request-parameters, response-fields 등
1
2
3
4
5
6
7
8
9
10
11
12
13
14
15
16
17
18
19
20
21
22
23
24
25
26
27
28
29
30
31
32
33
34
35
36
37
38
39
40
41
42
43
44
45
46
47
48
49
  @Test
      void getPosts() throws Exception{
          // given
          MultiValueMap<String, String> params = new LinkedMultiValueMap<>();
          params.add("page", "1");
          params.add("position", "");
          params.add("language", "");
          params.add("search", "");

          var parameterDescriptors = new ParameterDescriptor[] {
                  parameterWithName("page").description("페이지 번호"),
                  parameterWithName("position").description("개발 포지션"),
                  parameterWithName("language").description("기술 스택"),
                  parameterWithName("search").description("검색 키워드")
          };

          // 결과 데이터 생성
          List<PostDto.GetPostsResponse> postList = new LinkedList<>();
          postList.add(post1);
          PageRequest pageRequest = PageRequest.of(0,6);
          Page<PostDto.GetPostsResponse> result = new PageImpl<>(postList, pageRequest, 1L);

          // when
  				when(postService.findAllPostByTechStackNames(1,"","","")).thenReturn(result);

          // then,
          mvc.perform(
  									RestDocumentationRequestBuilders.get("/api/v1/posts/all")
                          .queryParams(params)
                          )
                  .andExpect(status().isOk())
                  .andDo(print())
                  // RestDocs 추가 설정(request-parameters)
                  .andDo(restDocs.document(
  									requestParameters(
                                  parameterDescriptors
                          )
                  ))
                  // OAS 설정, MockMvcRestDocumentationWrapper로 openapi3.yaml 생성
                  .andDo(
  										MockMvcRestDocumentationWrapper.document("{class-name}/{method-name}",
                      Preprocessors.preprocessRequest(Preprocessors.prettyPrint()),
                      Preprocessors.preprocessResponse(Preprocessors.prettyPrint()),
  										requestParameters(
                                  parameterDescriptors
                          )
                  ))
          ;
      }
- 테스트 코드가 성공한다면 build.gradle에서 설정했던 경로인 “build/generated-snippets”에 스니펫이 생성된다.
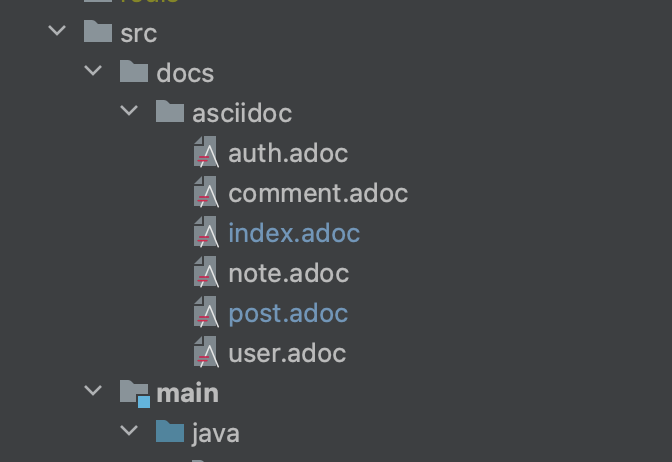
- adoc 파일을 작성한다.
- 위에서 생성된 스니펫은 단순히 request와 response에 대한 정보다.
이를 사용해 명세서를 만들기 위해서는 src 아래 docs/asciidocs라는 패키지를 만들어 .adoc 파일들을 생성해야 한다.
![adoc파일 경로]()
- adoc 파일은 asciidoc이라는 경량 마크업 언어로 작성해야 한다.
- markdown과 유사하지만 asciidoc은 include 가능
index.adoc 코드
1
2
3
4
5
6
7
8
9
10
11
12
13
14
15
16
17
18
19
20
21
22
23
24
25
26
27
28
29
30
31
32
33
34
35
36
37
38
39
40
41
42
43
44
45
46
47
48
49
50
51
52
53
54
55
56
57
58
59
60
61
62
63
64
65
66
67
68
69
70
71
72
73
74
75
76
77
78
79
  = Moa Moa API Document
  작성자 : 송지민(Moa Moa 백엔드)
  :doctype: book
  :icons: font
  :source-highlighter: coderay
  :toc: left
  :toc-title: 목차
  :toclevels: 3
  :sectlinks:
  :sectnums:

  == 개요
  이 문서는 테스트를 통과한 API들을 RestDocs를 이용해 문서화 한 'Moa Moa' 프로젝트의 API 명세서입니다.

  이 문서에 명세되어 있는 API를 바로 테스트 하고 싶으시다면 http://localhost:8080/swagger/swagger-ui.html 로,

  아직 개발중인 API와 함께 모아둔 문서를 확인하고 싶으시다면 http://localhost:8080/swagger-ui/index.html 로 접속해주세요.

  === 응답형식
  프로젝트는 다음과 같은 응답형식을 제공합니다.

  ==== 정상(200, OK)

  |====
  |응답데이터가 없는 경우|응답데이터가 있는 경우

  a|[source,json]
  ----
  {
      "code": "0000",
      "message": "회원 로그인 성공",
      "data": {}
  }
  ----

  a|[source,json]
  ----
  {
      "code": "0000",
      "message": "회원 로그인 성공",
      "data": {
          "name": "honeymon-enterprise"
      }
  }
  ----
  |====

  ==== 상태코드(HttpStatus)
  응답시 다음과 같은 응답상태 헤더, 응답코드 및 응답메시지를 제공합니다.

  [cols="3,1,3,3"]
  |====
  |HttpStatus |코드 |메시지 |설명

  |`OK(200)` |`0000` |"OK" |정상 응답
  |`INTERNAL_SERVER_ERROR(500)`|`S5XX` |"알 수 없는 에러가 발생했습니다. 관리자에게 문의하세요." |서버 내부 오류
  |`FORBIDDEN(403)`|`C403` |"[AccessDenied] 잘못된 접근입니다." |비인가 접속입니다.
  |`BAD_REQUEST(400)`|`C400` |"잘못된 요청입니다. 요청내용을 확인하세요." |요청값 누락 혹은 잘못된 기입
  |`NOT_FOUND(404)`|`C404` |"상황에 따라 다름" |요청값 누락 혹은 잘못된 기입

  |====

  == API

  //게시물
  // markdown과의 차이점, include를 통해 다른 .adoc 파일을 불러와 코드길이를 줄일 수 있다.
  include::post.adoc[]

  //소셜 로그인
  include::auth.adoc[]

  // 회원
  include::user.adoc[]

  // 쪽지
  include::note.adoc[]

  // 댓글
  include::comment.adoc[]
- RestDocs용 html 파일과 Swagger용 yaml 파일을 생성한다.
- 터미널에서 ./gradlew clean restDocsTest 명령어를 입력한다. 입력 시 build.gradle의 restDocsTest 테스크가 실행된다.
- 그 결과로 html 파일과 yaml 파일이 생성된다.
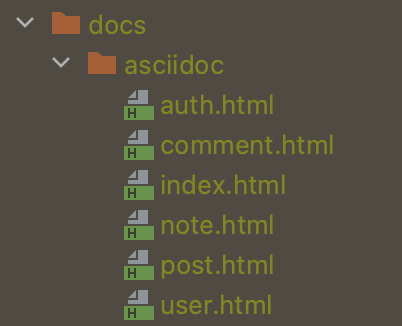
build/docs → 위에서 작성한 adoc 파일을 바탕으로 생성된 html 파일들이 모여있다.
![html 파일]()
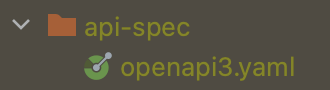
build/api-spec → build.gradle에서 작성한 openapi3 설정이 적용된 yaml 파일이 있다.
![yaml 파일]()
- 결과물을 jar 파일로 패키징한다.
- build.gradle에서는 bootJar 테스크를 통해 jar 파일을 생성한다.
- bootJar 테스크를 수정해 jar 파일 생성 시 결과물을 원하는 경로에 포함시킨다.
- Swagger에서 사용할 swagger-ui와 yaml 파일도 같이 포함시켜준다.
- swagger-ui에 대해서는 이후에 설명할 것이다.
- jar 파일 실행 후 http://localhost:8080/docs/index.html 로 접속한다.
- 위에서 jar 파일의 docs에 html 파일들을 포함시켜놨기 때문에 해당 경로로 접속 시 RestDocs로 만든 API 명세서를 확인할 수 있다.
Swagger 적용
- 위 RestDocs 적용에서 yaml 파일을 생성했고 jar 파일에 포함시켜 놨기 때문에 swagger-ui만 생성해주면 된다.
- swagger-ui를 다운받는다
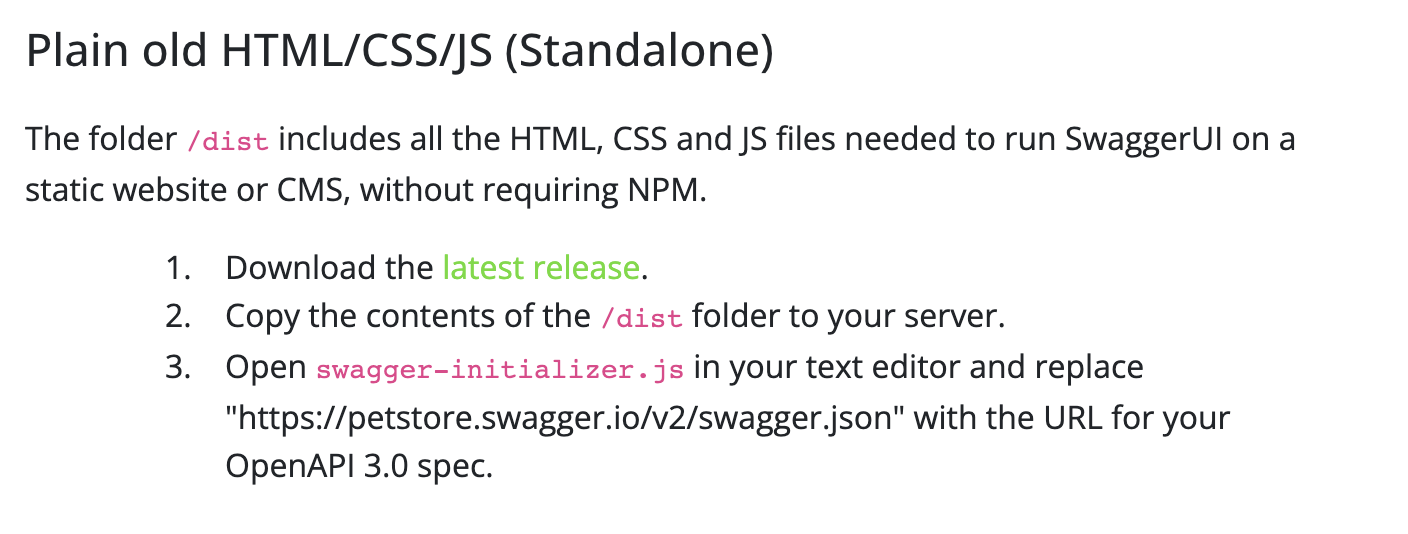
Swagger UI 정적 파일 설치 사이트 하단에 있는 ‘Plain old HTML/CSS/JS (Standalone)’부분에서 latest release를 다운 받아 /dist 디렉터리만 복사해준다.
![swagger-ui 정적 파일 설치 페이지]()
- 프로젝트 최상단(build.gradle과 같은 디렉토리)에 swagger-ui 디렉토리 생성 후 붙여넣기 해준다.
- 위 RestDocs 적용의 4번에서 jar 파일에 포함시켰던 swagger-ui가 이 디렉토리다.
- swagger-ui 내 index.html의 이름을 swagger-ui.html로 변경한다.
- swagger-initializer.js 내 url 경로를 jar 파일 내 openapi3.yaml의 경로로 설정한다.
swagger-initializer.js
1
2
3
4
5
6
7
8
9
10
11
12
13
14
15
16
17
18
19
20
  window.onload = function() {
    //<editor-fold desc="Changeable Configuration Block">

    // the following lines will be replaced by docker/configurator, when it runs in a docker-container
    window.ui = SwaggerUIBundle({
      url: "/swagger/openapi3.yaml", // 경로 수정
      dom_id: '#swagger-ui',
      deepLinking: true,
      presets: [
        SwaggerUIBundle.presets.apis,
        SwaggerUIStandalonePreset
      ],
      plugins: [
        SwaggerUIBundle.plugins.DownloadUrl
      ],
      layout: "StandaloneLayout"
    });

    //</editor-fold>
  };
- jar 파일 생성 후 실행, http://localhost:8080/swagger/swagger-ui.html 로 접속한다.
- RestDocs에 명세되어 있는 API만 확인할 수 있을 것이다.
결과
- 결과적으로 총 3가지를 확인할 수 있다.
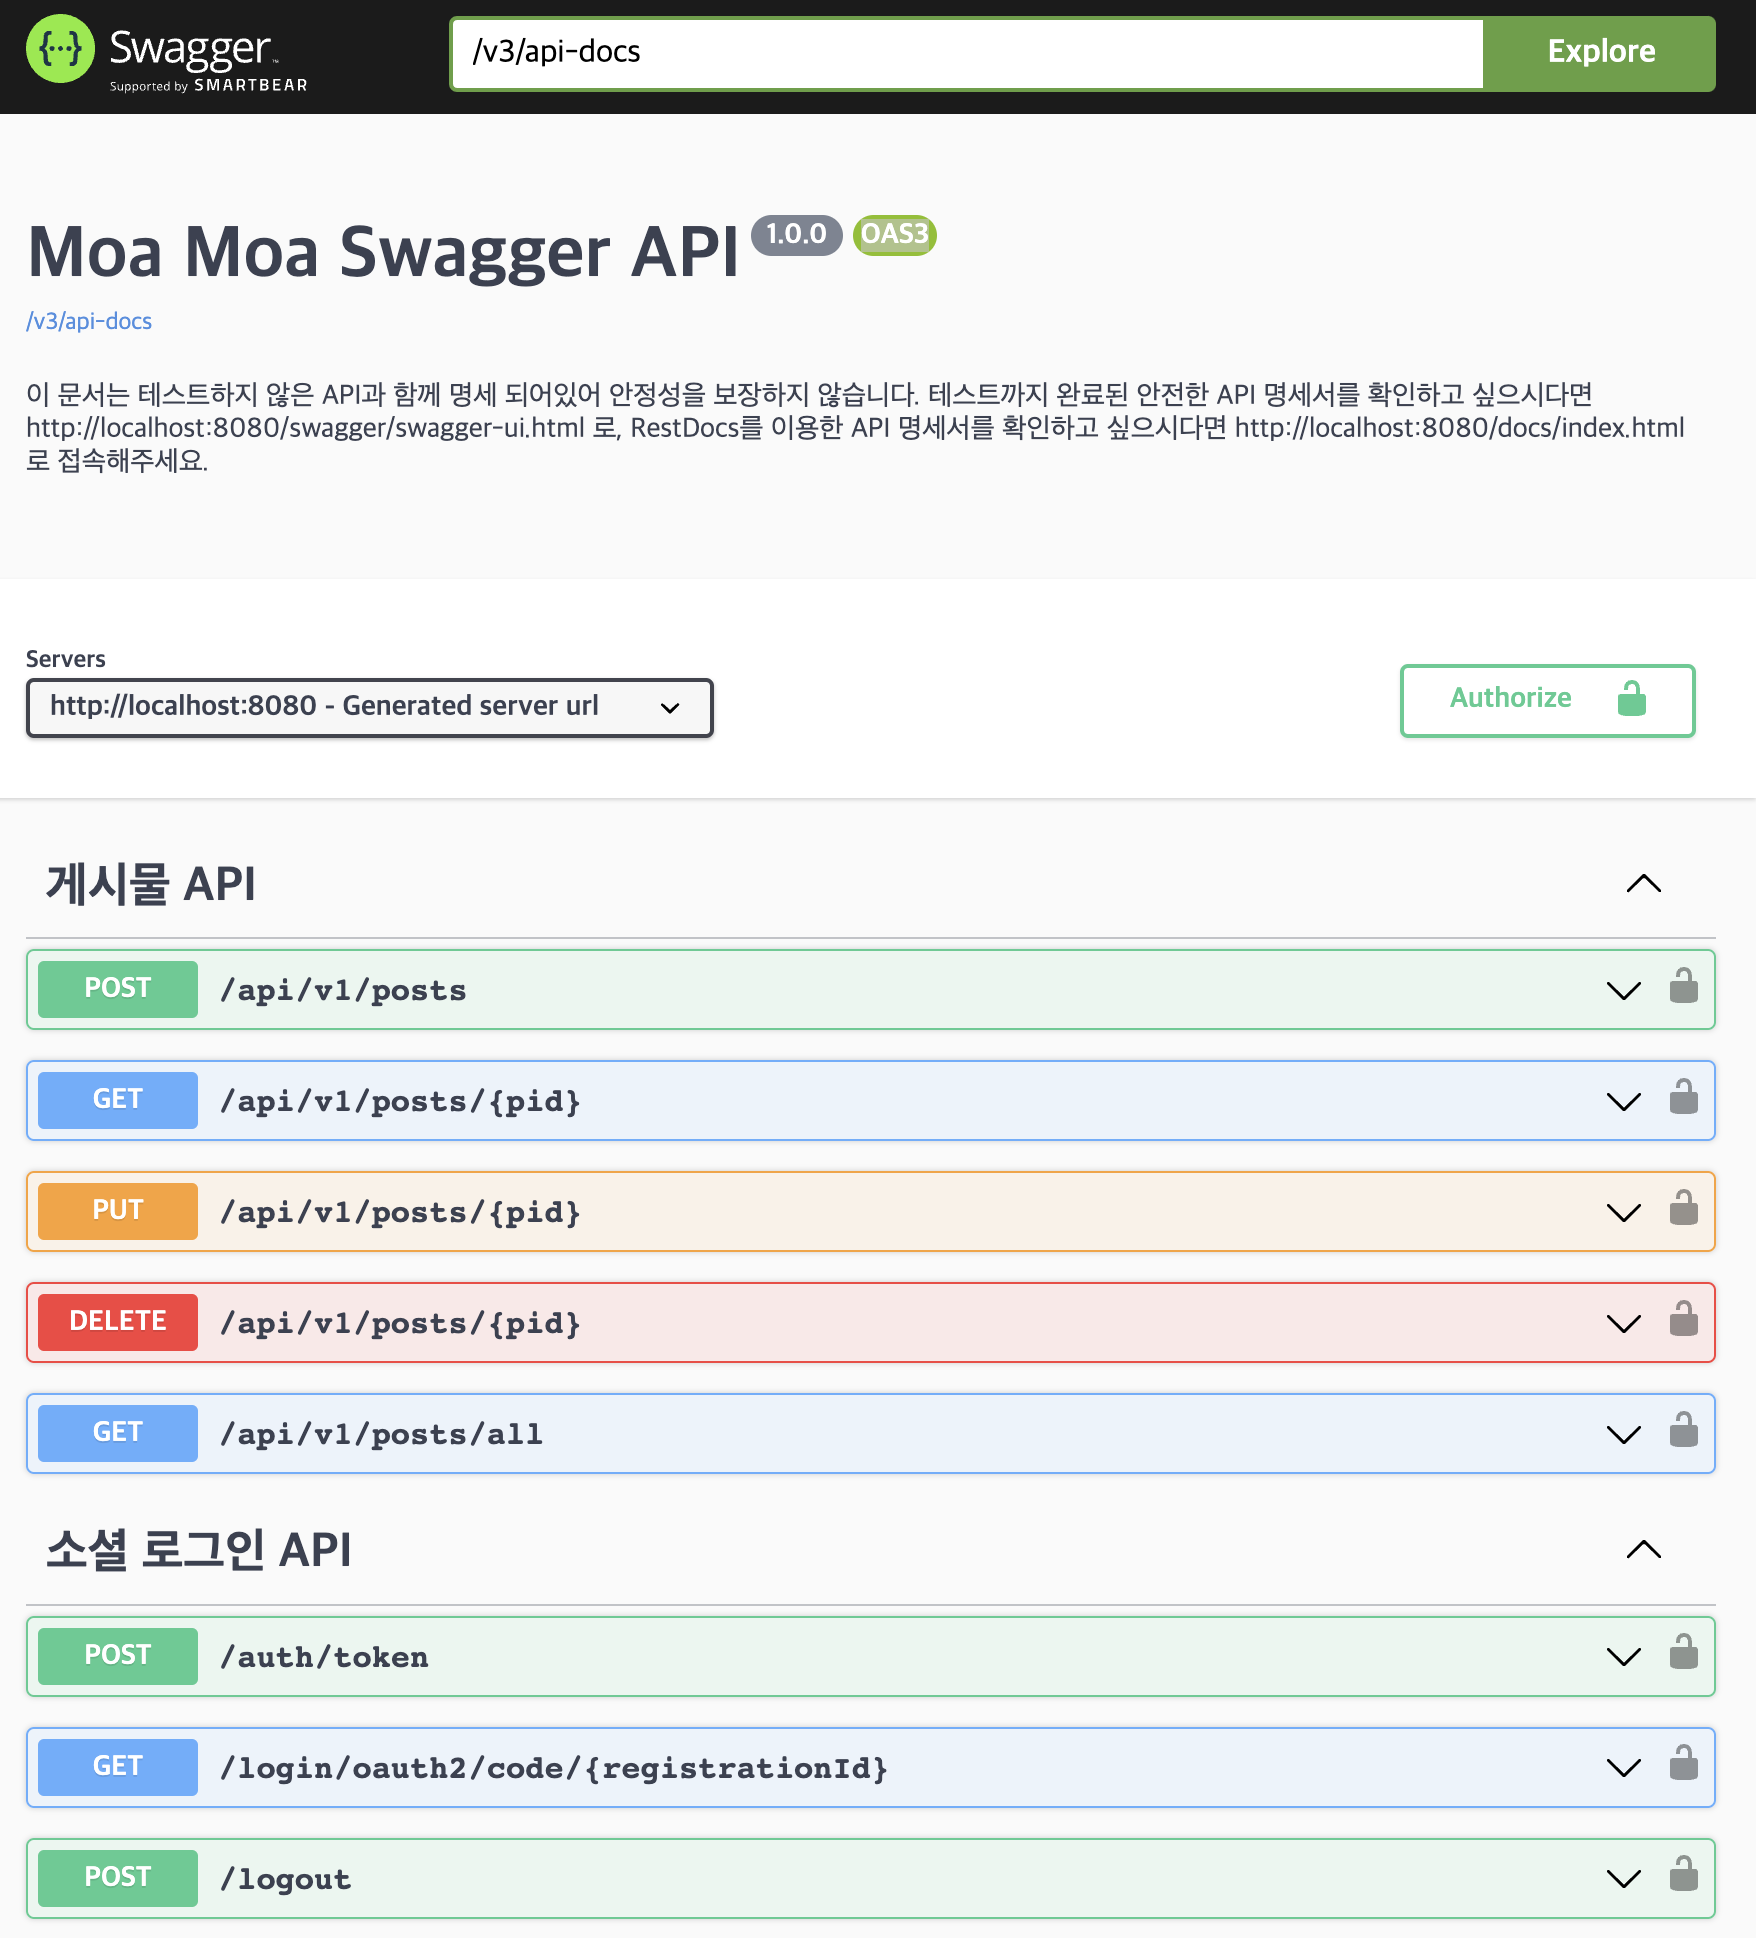
- 기존에 사용해오던 Swagger ( 테스트를 통과하지 않은 API를 확인할 수 있는 Swagger )
http://localhost:8080/swagger-ui/index.html
![기존 Swagger]()
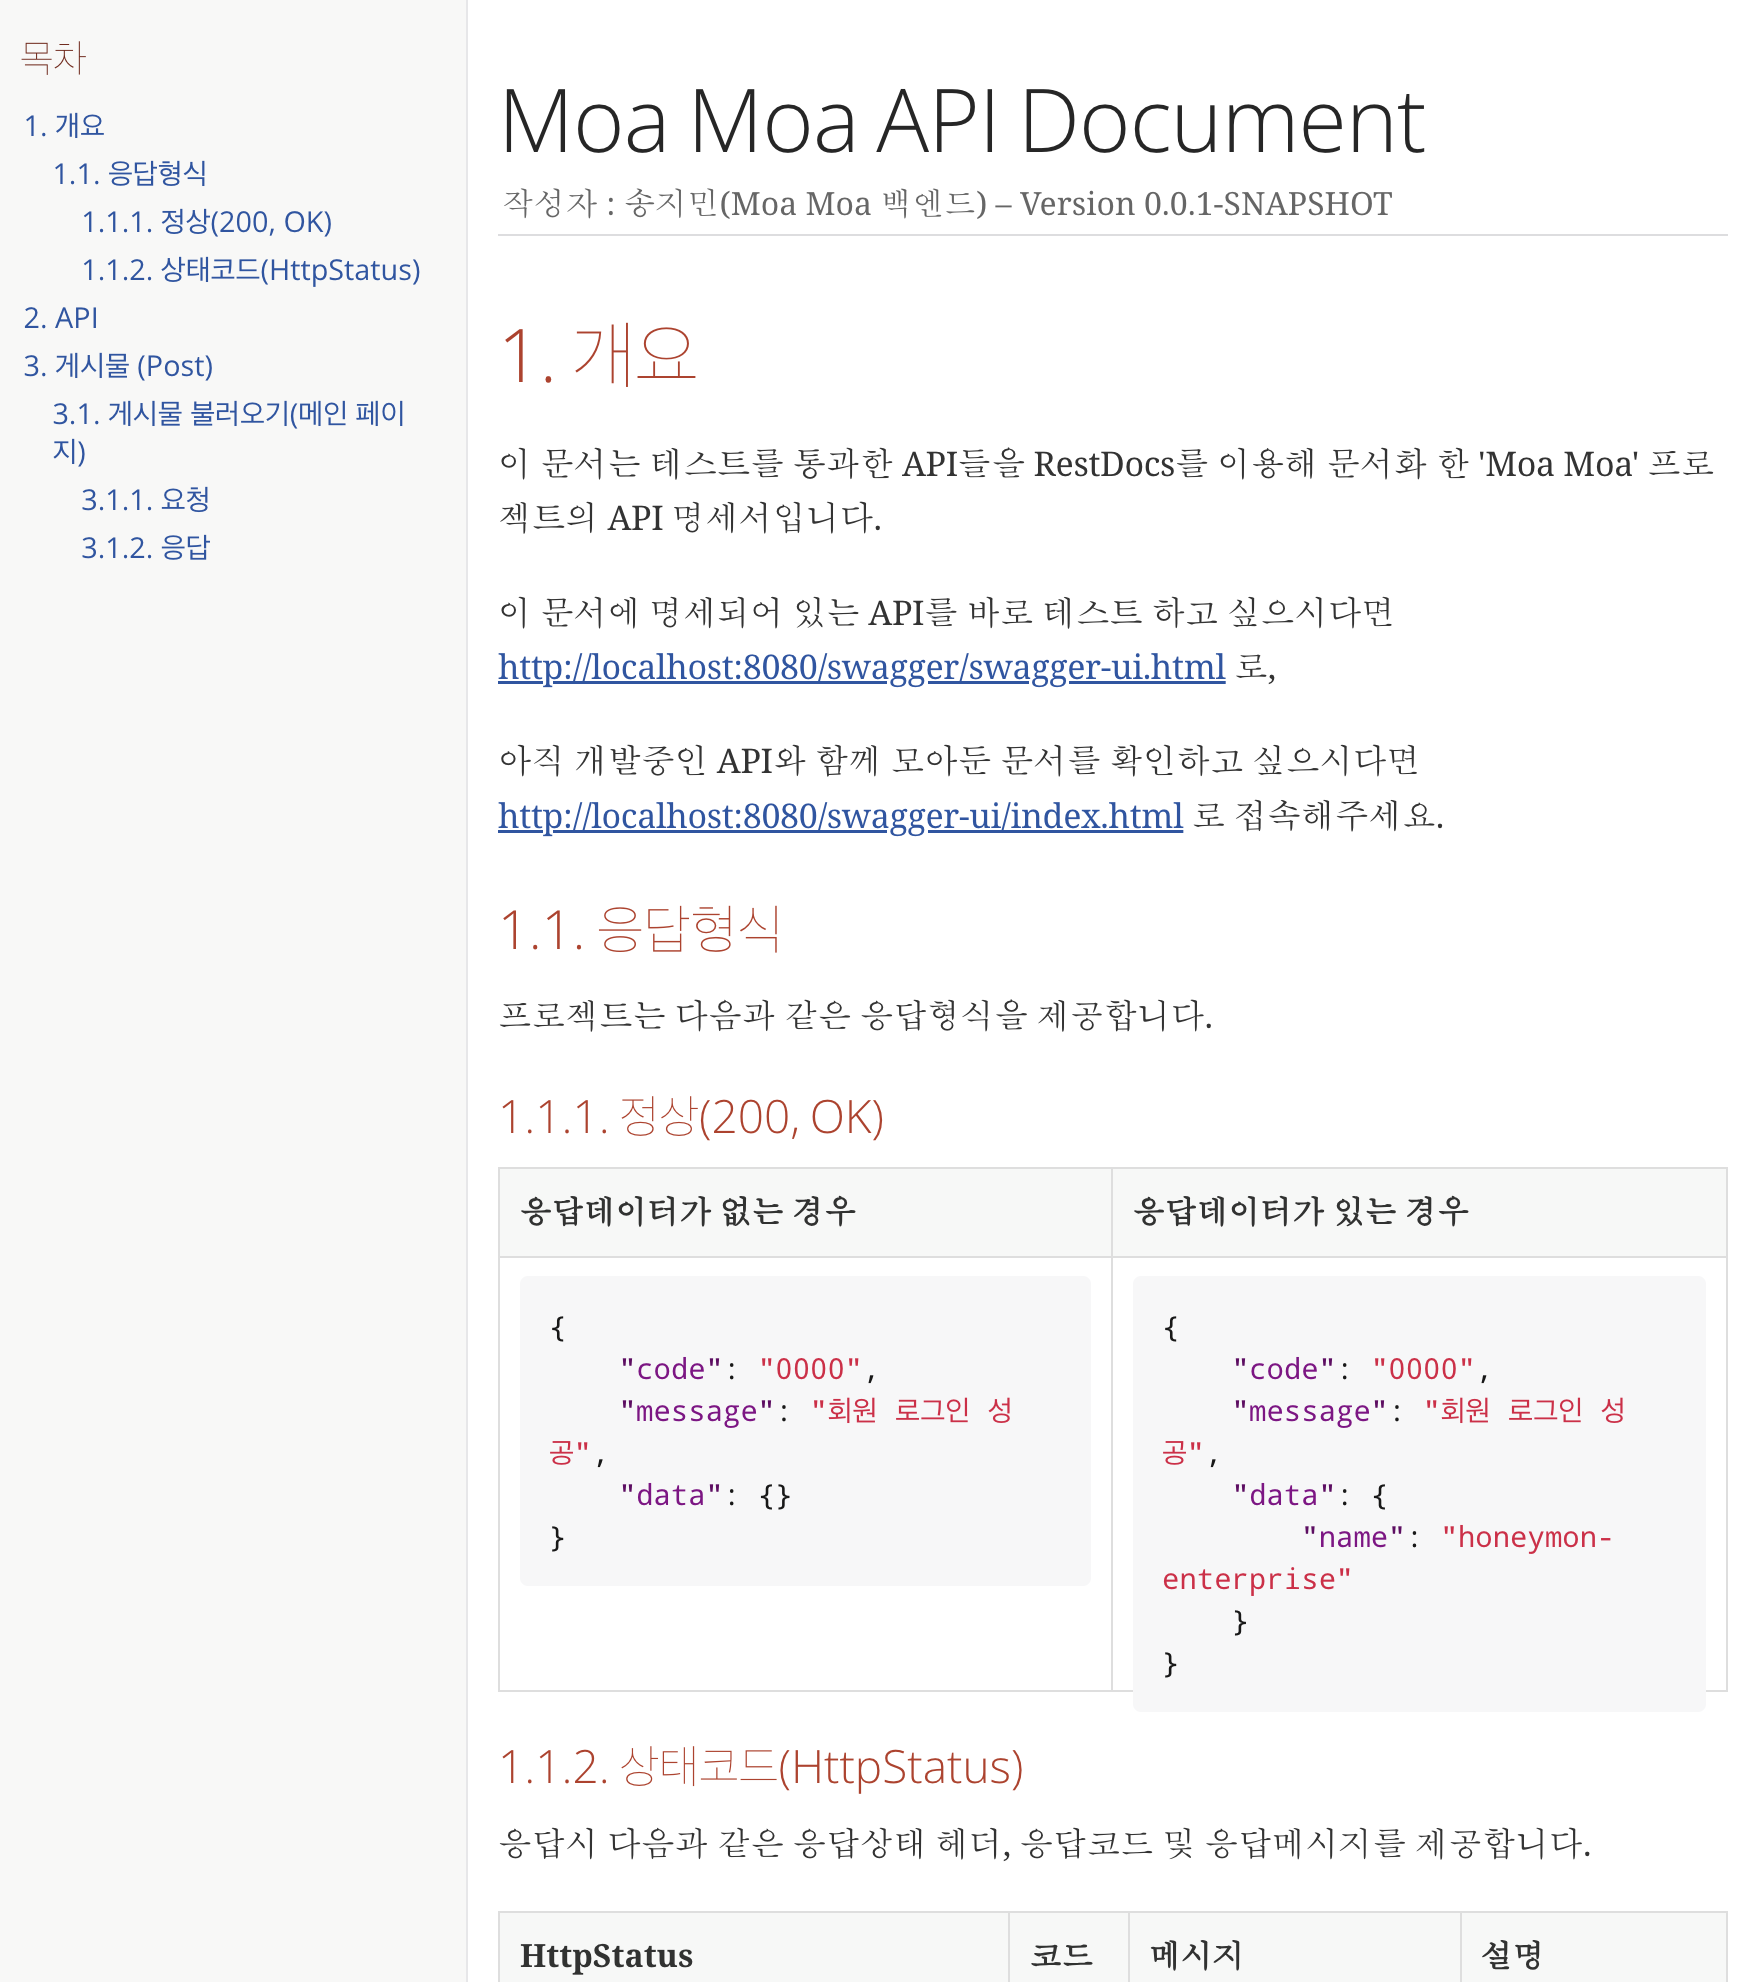
- RestDocs
http://localhost:8080/docs/index.html
![RestDocs]()
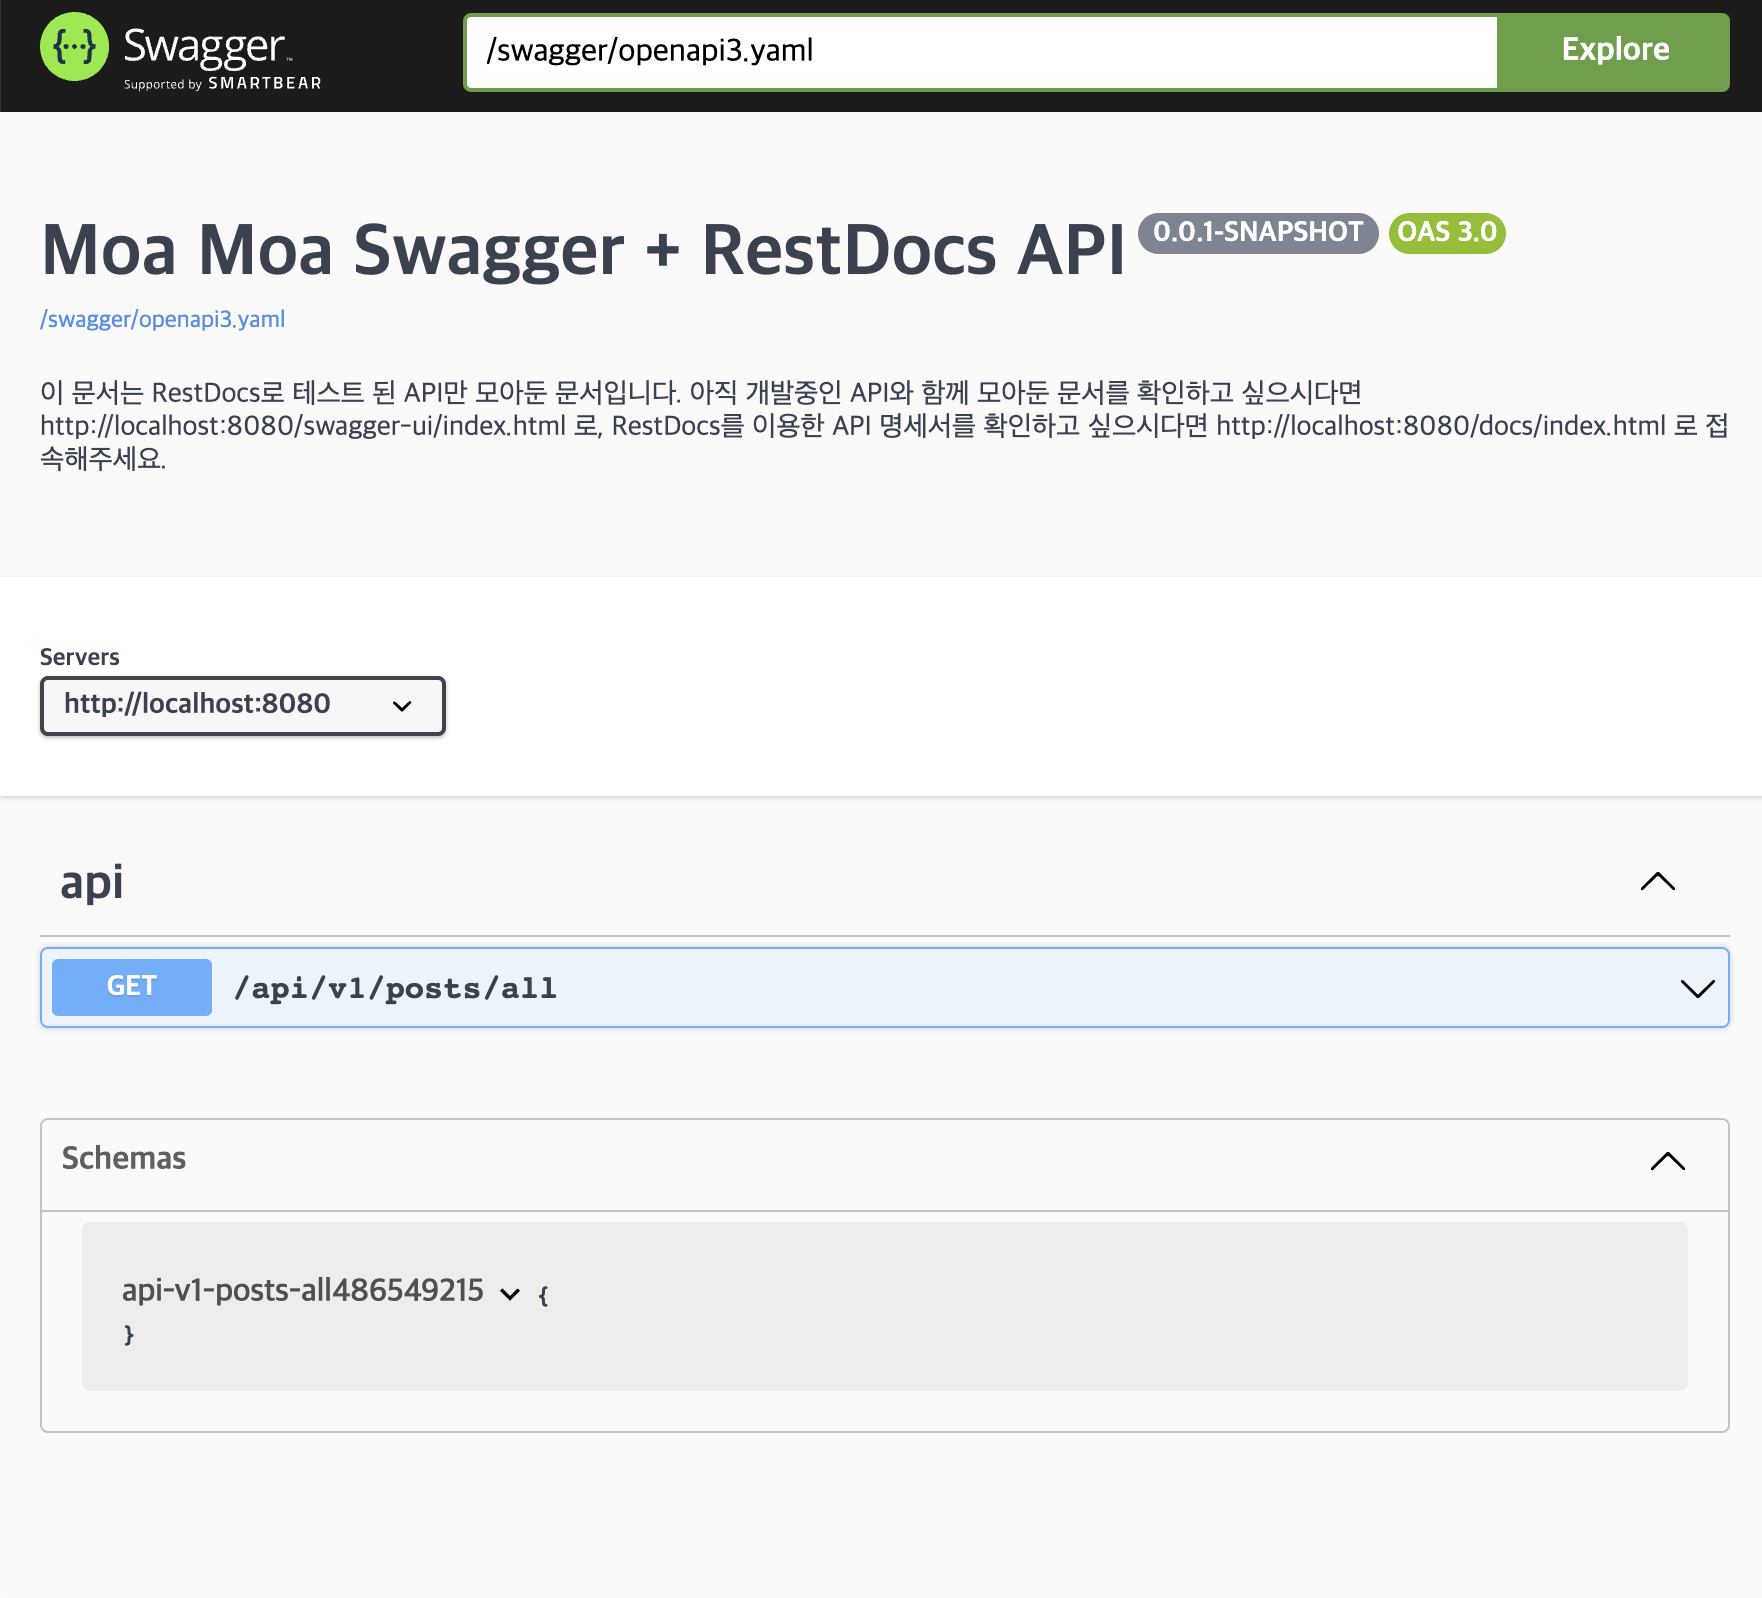
- Swagger + RestDocs ( 테스트를 통과한, RestDocs에 명세된 API만 확인 할 수 있는 Swagger )
http://localhost:8080/swagger/swagger-ui.html
![Swagger + RestDocs]()
- 기존에 사용해오던 Swagger ( 테스트를 통과하지 않은 API를 확인할 수 있는 Swagger )
참고
블로그
- https://jaehhh.tistory.com/120
- https://tech.kakaopay.com/post/openapi-documentation/
- https://backtony.github.io/spring/2021-10-15-spring-test-3/
- https://gruuuuu.github.io/programming/openapi/
- https://jwkim96.tistory.com/274
- https://helloworld.kurly.com/blog/spring-rest-docs-guide/#밋밋한게-아쉬우니까-spring-rest-docs-에-swagger-를-넣어보자